New Amazing Facts about Make up that you Never Knew
 new amazing facts about make up that you never knew. New Amazing Facts about Make up that you Never Knew
Make up is a significant piece of our life now. Ladies everywhere throughout the world spend a tremendous measure of cash on beautifying agents and make up. Ever considered how it all began?? Interestingly make up is as antiquated as you can envision. It has existed for a great many years. Cosmetics, as indicated by archeologists has been there for more than two thousand years and was at first utilized for restorative and also wellbeing purposes. Fascinatingly, the most intriguing things were utilized to apply all over in outdated. Things like lead, tar and a line of comparable components were utilize that we wouldn’t even dream putting over face now. The reach in beautifying agents has advanced and is presently significantly more skin well disposed. Here are some extremely fascinating, yet stunning truths explained by cosmetics craftsman “Michelle Phan” about cosmetics:
They say that in the past days, cosmetics was utilized to unnerve adversaries, demonstrate a social positioning or just to utilize enchantment. A few tribes still take after this custom on the planet.
Amid the colossal monarch of Egypt “Cleopetra’s” rule, she would splash her ship sails into fragrance so that the Romans would smell her aroma before her entry. Kind of like a prearrival cautioning wouldn’t you say?
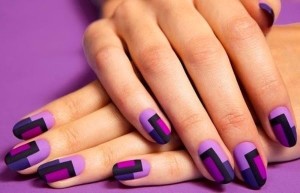
Neon nail shine is unlawful in the United States. While numerous brands tout neon shades, their hues don’t have the genuine neon colorant. Neon inside nail shine is not endorsed by the FDA.
There was a most appalling method for biting the dust hair dark in old times. The specialists would take solid decently encouraged parasites and place them in vinegar carafes. The substance would mature for two months until it transformed into a thick glue. The glue was then connected to hair and left on the hair to dry. Envision that!!
In the eighteenth century, Britain practically passed a law that permitted men to separate their wives on the off chance that they discovered them wearing cosmetics.
Consistently there are near to 900 million lipsticks sold around the world. That implies pretty much each and every individual in the US could possess three containers of lipstick!
The main ever nail shine was made in China in 3000BC. Not at all like the recipe today, the first form was a mixture of beeswax, gum, egg whites and shaded powder.
For a lady to wear cosmetics in Morrisville, Pennsylvania she must get a license first. Fortunately, nobody is authorizing this law!
In Renaissance Italy ladies made a definitive red lip and cheek recolor by blending cochineal, sandalwood or cinnabar with wax or oil. The application procedure was troublesome, yet the red shading went on for more than a week, regardless of the fact that she washed her face consistently.
Ladies used to squeeze their cheeks to provide for themselves ruddy cheeks before become flushed was concocted.
The antiquated Romans considered wrinkles, spot, sunspots, skin drops and flaws to be unfavorable. To diminish wrinkles, they utilized swan fat or jackass milk. Injuries and spot were treated with the cinders of snails.
Interestingly, Songbird dung are utilized as a part of geisha facials. It is connected wet and permitted to dry. It should decrease wrinkles and said to be an incredible peeling.
How To Hide Dark Circles

Tiredness and hardship in slumber can result in numerous eye issues. Puffiness, dark circles, eye sacks are the manifestations of need in slumber and maturing too. The vast majority of individuals are experiencing this issue that is exacerbating their delightful looks. It is truly critical to conceal the dark circles particularly when heading off to any essential occasion.
Pick a yellow based concealer if your dark circles are blue tinged. Use peachy based concealer on the off chance that they are chestnut or yellow. Make a point to pick lighter shade of yellow based concealer than your skin tone. The utilization of concealer provides for you moment help from dark circles. So to right away shroud your dark circles try for rich recipes of concealer. The smooth concealer won’t settle in scarcely discernible differences and floats over your skin making it look more smooth and free from dark circles.
In the event that you are picking a dry fine item to apply under eyes, you are committing most exceedingly terrible error. A light smooth concealer will work best as it settles down in your scarce differences. You can likewise pick shimmery cream. For the impression of light beneath your eyes, prime gleam based cream. After use of cream and concealer, apply a slender layer of powder to keep the look more characteristic.
The greater part of time, individuals use establishment and substantial base to conceal defects from the face. You can utilize your establishment as concealer. In the event that you are applying fluid establishment, crush it on your palm and let it oxidize. The cream will get to be more thought after oxidation and it will simple for you to utilize your establishment as concealer.
Individuals apply concealer under the whole eye. Be that as it may its not the right approach to apply concealer to conceal the dark circles. Specialists encourage to apply concealer precisely where you have dark circles rather than beneath whole eye. The spot where you need to apply concealer is ordinarily a semi circle that ranges from inner part of the eye to the cheeks. Delicately apply it with your finger or delicate brush. It is dependent upon you what brush you pick for the use of concealer. While applying concealer on the dark circles don’t disregard deepest corners of the eyes where dull shade is likewise showed up.
When you are getting prepared and applying establishment, face powder and different items then you may be befuddle that when to apply concealer on the dark circles. The best time to apply concealer is after utilization of eye cosmetics and establishment. Whatever you apply beneath your eyes to shroud dark circles mix it delicately. A decent mixing of items is the way to get smooth look.
Apply dim cocoa or dark liner to upper lash line. To make your eyes look open and light up your entire face, apply impartial shimmery eye shadow to your covers. Apply two covers of mascara to upper lashes just. Try for mascara that is water evidence to avoid increment in dark circles brought about by smearing.
Here are some different routes additionally to anticipate and conceal dark circles. Don’t utilize eye cream lotion before going to cot. Keep away from salt, liquor and perk to forestall puffiness before the night of vital occasion. It is basic to take fitting slumber of eight hours to dispose of puffy eyes and eye sacks. Drink most extreme water to keep the skin crisp and to dispose of dark circles.
New Spring Nail Color Trends
This year is considered as the year of nail pattern. Design would be inadequate without excellent nails. Nails – if wonderfully painted – expand the magnificence of hands generally pale and messy nails look ignoble. Nail hues are the most sultry frill not long from now. In the event that you are in urgent need of progress in this spring, the season of hues, why not run with spring nail shading pattern? You will certainly love it.
Whatever nail shading you wear, dependably remember one thing that you oftenly touch up your nails and they are most noticeable part so your nails must be cool and eye getting on the grounds that flawlessness is a key with shades. To have immaculate nails you can play with distinctive brilliant shades this spring. Pick lovely spring hues. Spring has a considerable measure of shades. There are some thought regarding spring nail pattern and spring nail shading pattern that you can take after to make your hands pretty and hot.
This spring the state of nails has taken focal stage. Thin and long nails with adjusted focuses are famous and in design in this spring. Amplified nails extend your fingers that appear to be wonderful. You can improve your nails by utilizing distinctive shades, surfaces and outlines.
A few females like light nail hues while others like dim as per their decision. Light shades of nail shine are in pattern particularly in spring. The light shades that are all that much being used and well known incorporate cold pink, cool lilac and shimmery yellow. Velvety delicate shades of dark, pink and white look reviving. Simply remember the suitable shading blend.
Nail treatment has been in pattern for a long time. Various nail trims are being utilized by larger part of young ladies. The better approach to do a half moon nail treatment. You can utilize dark shade on white with stroke system. Dark shade on white inexplicably makes the tip of your nails significantly more attractive making a pretty French nail treatment impact.
Dark nail shine is the most prominent among youngsters. Its not only for nightfall fans and high school goths. I would propose you to wear dark nail shading this spring. Dark shade is clear with a new and hot style. You can run with Silver and white shades on dark with distinctive outlines especially with stroke strategy. It looks hot. This spring nail pattern will never be exhausted, I let you know.
Mint green has been well known for most recent two years in spring. This shading can be conveyed into spring not long from now. You can paint your nails with mint green shade to be more polished and stylish. In the event that you love your nails to be striking however not overpowering then you can run with lime and mango hues that give a new look to your nails.
Chipped nail shine is not in style this spring. In the event that you are sparkle mate then you ought to most likely paint your nails with sparkle. Beaded nails are as yet going solid in this spring. At whatever point you paint your nails with sparkle, you must complete off your nails with an alternate layer of topcoat overall gleam specks on nail shading obstacle your garments. Glittery nails look girly as well as in vogue and great.
* Choose a style that maximizes your best features. probably, the most important feature you should consider is your face shape-is it round, oval,square or long?
* Make sure you brush your hair and make it tangle-free before styling.
* Before you start, read through the steps and imagine yourself styling your hair. Concentrate & think how you will carry out each step.
* Do not use the mirror as you style your hair. The reversed image might mislead.
* You can even close your eyes & concentrate till you've finished.
* Don't tense shoulders while you're styling. The position might be unfamiliar, but tensing won't help.
* Keep hair clips, pins & rubber-bands within reach. They'll be of help in keeping certain sections of your hair out of the way, while you're doing up the others.
* Decorating your hair with fresh flowers, brooches or beads could be a good idea.
Hair Styles
We will explain 7 exciting different hairstyles for you. Try it out and send us your feedback.
High Point: Gather all the hair to the back of the head and make a high ponytail. Take 3 nets and pin it on the ponytail. Divide the ponytail into 3 sections. Fold the first section into two layers and cover the hair with the net. Roll the hair with two fingers and place it on top of the ponytail and secure with a pin inside. Repeat the same with the other 2 sections of the hair and secure the rolls. Secure the rolls above the ponytail with pins.
Beehive:Gather all the hair at the back of your head. Hold all the hair in one hand and twist until it doubles back on itself. Secure by placing a pin, just catching the hair centrally, leaving out the sides. Fan out the ends by separating the hair into fluffy loose curls, and pin them as you want.
French Connection: Part the hair sideways at the front. Comb back a section of the hari from the crown and braid it. Secure with an elastic band. Draw all the remaining hair to the back of your head and wrap it around one hand, from right to left. Roll the hair inwards, so that the end is tucked in smoothly. Begining at the bottom of the roll, secure it with pins. Fold the braided hair into two (based on hair length) and place it over the pin area, and secure onto the top of the roll using a pin.
Curly Wurly: Part the hair in the centre, from the forehead to the middle of the crown. Smoothen out the hair at the back and secure into a ponytail with an elastic band. For the hair in front, take small sections (about 1 inch) from the hairline to the crown, twist 3 or 4 turns and secure it with a pin over the ponytail. Divide off a small section of the hair from the ponytail. Holding the end, twist the hair until it rolls back on itself to form a coil. Position the coil in a loop and secure using hairpins. Continue in this manner, till all the hair can be coiled.
Queen of Braids: Gather a portion of hair at your temple and divide into 3 equal parts. Braid the first 2 turns the normal way. Take a few strands of loose hair from the side of the head and add to the part you are braiding. Continue to take up loose hair and weave into a braid gathering strands alternately from each side. Entwine the parts as you go along. Stop when it reaches the nape of your neck. Repeat the same steps on the other side of your face. Make a simple plait using the two side braids and the loose hair at the centre. Continue braiding till complete.
Honey Bun: Part the hair in the centre in a zigzag style from the forehead to the middle of the crown and then make a high ponytail at the back. Take approximately one third of the hair, from the top of the ponytail, braid till the end, and them secure with an elastic band. Gather the remaining hair of the ponytail and twist it, making sure all loose ends are tucked in. Bring the hair up and around, pinning it underneath to form a bun. Wrap the braid around the bun and secure the ends with a pin underneath. Now, gather the hair in the front and tuck it under the bun at the back, for a perfect finish.
Low Behold!: Part the hair at the centre, from hairline to the middle of the crown. Make a braid on both sides till the ear and secure it. Gather the rest of the hair into a low ponytail at the back. Roll the haif from underneath using two fingers and forma a low bun. Use a net to secure bun in place. Bring the brairded hair towards the ponytail from either sie and overlap or roll over the pony, depending on the length of the hair. Secure it in place with a pin.
Go to next page
The End
|
|


